Thursday, 18 December 2008

Domain Specific Languages (VI)

Generating Code from the Model

The DSL will now be tested by producing a model, and developing a T4 template to generate code from the model.
  • In the DSL (running under the Visual Studio Experimental Hive), open Sample.mydsl, and draw a model of a Male class inheriting from a Person class, and a Female class inherting from the same Person class. Set the Visibility property of all classes to public.
  • Open MyDSLSampleReport.tt. In text templates, you indicate directives by using <#@ tags, statements with <# tags, and expressions with <#= tags.
  • Change the output extension directive to .cs.
  • Comment out the generated material line.
  • Change the foreach loop to that shown in the image below. To use code outlining and intellisense, download and install the Clarius T4 Editor. The loop states that for each Class in the ClassModel, display the class Visibility, the word class, the class Name, and then if the class has a BaseClass, to display the BaseClass name after a colon.

  • Save the T4 template and examine the generated code (MyDSLSample.cs). The generated code lists the class visibility, the class name, and the base class (if applicable).
Conclusion

In this series of posts I've shown you how to create and customize a simple Domain Specific Language by using the DSL Tools that are part of the Visual Studio SDK. There’s a lot more to DSLs than covered here, including more extensive customization, adding and using coherence rules, performing model validation both interactively and on request, writing more extensive T4 templates, and deploying a DSL by obtaining and adding the necessary package load keys, and creating a DSL setup project. For more information on these topics, see the VSX website.

Domain Specific Languages (V)

Customizing the Graphical Notation

The DSL graphical notation will now be customized:
  • Rename ExampleShape to ClassShape.
  • Change the Fill Color property of ClassShape to a suitable colour.
  • Change the Geometry property of ClassShape to rounded rectangle (the standard for UML class diagrams).
  • Add a text decorator to ClassShape called Visibility. This is necessary so that the user can enter a visibility level (public, private etc.). To do this, right-click on ClassShape and select Add->Text Decorator.
  • Map the Visibility text decorator to the Visibility property of Class in the DSL Details window. To do this, click the DSL Details window, and select the line that links ClassShape to Class. In the DSL Details window, select the Decorator Maps tab, select the Visibility check box, and then set the Display Property combo box to Visibility. This ensures that when the user enters a class visibility, that it will be stored in the Visibility property of Class. Close the DSL Details window.

  • Rename NameDecorator to Name.
  • Rename ExampleConnector to ClassConnector.
  • Change the Target End Style property of ClassConnector to Hollow Arrow (the standard for UML class diagrams).

After making these changes, your domain model should look like:

Customizing the DSL Toolbox

  • In DslExplorer, expand Editor/Toolbox Tabs/MyDslSample/Tools.
  • Change the Name property of ExampleElement to Class.
  • Change the ToolTip property of ExampleElement to “Creates a Class”.
  • Change the Name property of ExampleRelationship to Inheritance.
  • Change the ToolTip property of ExampleRelationship to “Drag between Classes to create an Inheritance relationship”.

Click the Transform All Templates button. Once the template transformation process has finished, build the application and run it without debugging. The DSL will launch in the Visual Studio Experimental Hive.

Domain Specific Languages (IV)

Customizing the Domain Model

In order to produce a DSL for modelling simple inheritance relationships, the minimal language domain model produced by the wizard will have to be customized. This will involve renaming the name of the domain classes and domain relationships, adding a new domain property to store the class visibility (public/private etc.), and adding a textual decorator to display the visibility property:
  • Rename ExampleModel to ClassModel.
  • Rename the ExampleElement domain class to Class.
  • Rename the Elements role to Classes.
  • Rename the ClassReferencesTargets relationship to Inheritance.
  • Rename the Targets role to BaseClass.
  • Change the Multiplicity property of BaseClass to 0..1.
  • Rename the Sources role to DerivedClasses.
  • Add a domain property to Class, named Visibility of type String (will enable the user to specify the visibility of the class). To do this, right-click on Class and select Add->DomainProperty.
After making these changes, your domain model should look like:

Finally, click the Transform All Templates button.


Template transformation should always be performed when anything changes in the model, so that the generated code reflects the domain classes and domain relationships on the diagram.

Domain Specific Languages (III)

Understanding the Domain Specific Language

The generated graphical DSL includes the following features:
  • Domain Model: a DSL is defined by its domain model. The domain model includes the domain classes and domain relationships that form the basis of the DSL. The domain model is not the same as a model. The domain model is the design-time representation of the DSL, while the model is the run-time instantiation of the DSL. Domain classes are used to create the various elements in the domain, and domain relationships are the links between the elements. The domain model can be seen in the Classes and Relationships swimlane of the image below.

    Every domain relationship has two roles: a source role and a target role. The Name property of a role is the name that is used to navigate from a domain relationship to one of the domain classes that it connects. The PropertyName property of a role is used to navigate from an element at one end of the relationship to the element or elements at the opposite end of the relationship. The DisplayName property of a role is used in the DSL Explorer to show relationships between elements. By default, the value of the DisplayName property is the same as that of the Name property.

    Multiplicities specify how many elements can have the same role in a domain relationship. In most cases, the number of relationships that are connected to a given element is the same as the number of elements that are connected through those relationships. In the diagram, the zero-to-many (0..*) multiplicity setting on the Elements role specifies that any instance of the ExampleModel domain class can have as many ExampleModelHasElements relationship links as you want to give it. A multiplicity of one (1..1) on a role specifies that each instance of the domain class can have only one link in the relationship.


  • Graphical Notation: a DSL has a set of elements that can be easily defined and extended to represent domain-specific constructs. A graphical notation consists of shapes, which represent the elements, and connectors, which represent the relationships between elements, on a graphical diagram surface. The graphical notation can be seen in the Diagram Elements swimlane in the image above.
  • Artifact Generators: one of the main purposes of a DSL is to generate an artefact, for example, source code. A change in the model typically results in a change in the artifact. Here, artifacts are generated from T4 files (file extension .tt). In the Dsl project, look at the T4 files in the GeneratedCode folder, and the corresponding C# files they generate.

  • Serialization: a DSL must be persisted in a format that can be edited, saved and reloaded. DSL Tools use an XML format.

Domain Specific Languages (II)

Creating a Domain Specific Language

If you've installed the Visual Studio 2008 SDK, there will be some new project templates available for you to use when you choose New Project in Visual Studio. Select the Domain-Specific Language Designer project type, which can be found underneath Other Project Types and Extensibility. Choose a name for your project (MyDslSample), make sure it will be saved in a suitable location and then click OK. The Domain-Specific Language Designer wizard will appear and guide you through the process of creating a DSL solution.

The first step is to choose one of the solution templates. By choosing the template that most closely resembles the language that you want to create, you can minimize the modifications that you have to make to the starting solution. The solution templates that are available are:
  • Class Diagrams: use this template if your DSL includes entities and relationships that have properties. This template creates a DSL that resembles UML class diagrams.
  • Component Models: use this template if your DSL includes components, that is, parts of a software system. This template creates a DSL that resembles UML component diagrams.
  • Task Flow: use this template if your DSL includes workflows, states, or sequences. This template creates a DSL that resembles UML activity diagrams.
  • Minimal Language: use this template if your DSL does not resemble the other templates. This template creates a DSL that has two classes and one relationship.

Create a minimal language DSL and give it a name (MyDslSample). The wizard will register a new file type for models in your language. Therefore you should choose a file extension that is unique to your system. Accept the default icon for the model files, as it can be changed later if necessary. Accept the default values for the product name, company name, and top level namespace that will be used in the solution. Sign your assembly with a strong key name, review your choices and then click Finish. Visual Studio will create a solution consisting of two projects:

  • Dsl, defines the DSL and its editing and processing tools.
  • DslPackage, determines how the language tools integrate with Visual Studio.

After the solution is created, a large amount of code is generated automatically from the DSL description file (DslDefinition.dsl) by applying a custom tool called TextTemplatingGenerator to the files in T4 format.

Domain Specific Languages (I)

Domain Specific Languages are a relatively unknown piece of Visual Studio Extension technology. In this series of posts, I'm going to describe how to create a Domain Specific Language for modelling simple inheritance, and generating code from the model. The purpose is to do it from scratch, see the process, and understand the concepts involved. You’ll require Visual Studio 2008 Service Pack 1, and the Visual Studio SDK 1.1 to do this on your own machine.

Unlike a general purpose language such as C#, a domain-specific language is designed to handle a particular problem space, or domain. Domains can be defined in many different ways. Some domains are associated with specific industries or kinds of business (insurance domain, financial services domain, library domain). Other domains relate to specific kinds of software development (Web service components, GUI components etc.).

Typically, DSLs are created when a development team has to write similar code for different projects. For example, a team may have to develop several different insurance policy applications. The applications may use the same constructs, for example, a table that specifies the policy prices in different areas, in different ways. In a DSL, the price/area table can be a language element that is handled differently in each application.

DSLs can either be textual or graphical. An example of a textual DSL is an XML schema. Textual DSLs are difficult to develop and debug, and non-technical people may find them hard to understand. Graphical DSLs are easier to work on and easier to use for communicating with non-developers.

Domain-specific development is the process of identifying the parts of your applications that can be modelled by using a DSL, and then constructing the language and deploying it to application developers. The developers use the DSL to construct models that are specific to their applications, use the models to generate source code, and then use the source code to develop the applications.

The benefits of DSL development include:
  • DSL consists of elements and relationships that directly represent the logic of the problem space. Therefore, its easier to design the application, and find and correct errors of logic.
  • They let non-developers and people who do not know the domain understand the overall design.
  • Developers can use the code that their model generates to quickly create a prototype application that they can show to clients.
DSL Tools let you create a DSL that has your own graphical designer and your own diagram notation, and then use the language to generate appropriate source code for each project.

Wednesday, 17 December 2008

The CM Christmas Card - Powered by Deep Zoom!

Take a look for yourself by clicking the following link!

http://www.contentmaster.com/holiday-08/

Note that you will need the Silverlight plug-in installed to view the card. If you do not have it (or are unsure if you have it or not) the link will guide you the official Silverlight website where you can download it.

Deep Zoom was introduced to the world by Vertigo at the Mix 08 conference with their amazing Hard Rock Café Memorabilia application. It is an implementation of the Microsoft SeaDragon project that is more commonly used in Silverlight applications but is now appearing in other technologies such as Ajax.

As you can see from the Christmas card, DeepZoom gives the impression that the user is able to pan and zoom a very large image in a very smooth and seamless manner with very little lag and loading time. This is made possible by Deep Zoom’s XML based file format and a large “collection” of separate images that are arranged in a pyramid. These are then loaded as on the fly depending on where the user is located within the collection.

To help you on your journey across the sea of pixels, we have wrapped the Deep Zoom control (Silverlight’s MultiScaleImage control) with a navigation menu to give you easy access to a pan control, a Zoom slider and a “Home” button in case you loose your way.

Also check out the CM and Luminosity websites by clicking the relevant logos

Happy Holidays!

Visual Studio Project System

Following on from the previous post on Visual Studio extensibility (VSX), I'd like to point out an extremely useful resource for anyone looking at extending Visual Studio's project system. The IronPython project is hosted on CodePlex with all of it's source code for you to look at. From the perspective of Visual Studio, this shows you how to create a complete project system! So you can see implementations of new project and item templates with parameter substitution along with wizards. It also includes things like intellisense and a custom build environment for the IronPython language. A lot of this is achieved using another Codeplex project - the Managed Package Framework for Projects (MPFProj) - which gives you a framework for building a custom project environment in Visual Studio. At the moment MPFProj is not included as part of the Visual Studio SDK, and you need to include all the MPFProj source in your own project - but keep an eye on this project here (VSXtra) for a DLL containing a pre-compiled version of the MPFProj code.

Extending Visual Studio

I've recently had the opportunity to investigate some of the extensibility features in Visual Studio 2008, and not surprisingly there are a lot of different methods open to you. By extensibility I mean extending the functionality of Visual Studio over and above what's in the box in some way, not just customising the IDE to suit your way of working. Here are the main ways you can set about extending Visual Studio, starting with the simplest and moving to the most advanced.

Templates enable you to define your own variations on standard project types or items. So if you find yourself repeatedly recreating the same basic project over and over again, a new project template can save you a lot of effort. Simply create the basic project you'd like to reuse, and then use the "Export Template Wizard" from the File menu in Visual Studio. Then you'll have a new project type available whenever you create a new project in Visual Studio. You can do the same kind of thing with individual items, so for example you could have a new form type, already populated with some controls and code.

Macros are the next step up, and they work in a very similar way to macros in Office applications. Visual Studio has a macro recorder, so you can record a sequence of operations in the IDE for later play back. These macros are recorded as Visual Basic code, and Visual Studio has a built macro editing environment for tweaking the recorded code. Macros also work as a great learning tool, so if you want to learn how to automate something in Visual Studio you can record a macro and then analyse the code to see how it's done. For an overview of the range of functionality available check out this diagram of the Visual Studio Automation Object Model.

Add-ins come next and offer a couple of features over and above macros. For a start they can be distributed as compiled code and they can be written in any language that supports COM automation. Most importantly they provide a greater degree of integration with Visual Studio, allowing you to add commands to Visual Studio menus and toolbars, add new pages to Visual Studio's Options dialog, and create new tool windows in Visual Studio.

Top of the range though are Visual Studio Packages. To create a package you'll need to download and install the latest version of the Visual Studio SDK and accompanying documentation. The Visual Studio SDK and the package system enables you to do pretty much anything with Visual Studio. All of Visual Studio's existing functionality is written in the form of packages, so you can implement new editors, tool windows, project systems and even re-purpose the basic shell. The VSX website has loads of material on extending the Visual Studio IDE, and a catalogue of available extensions (some free, some commercial).

Friday, 12 December 2008

Libraries and Homegroup in Windows 7

Libraries

The Windows 7 team have introduced a new feature in Windows Explorer called Libraries. Libraries are a collection of indexed folders, such as Documents, Downloads, Music, Pictures, and Video libraries. In these libraries, you can group files that are stored anywhere on your computer or even externally, and view them all in one experience without physically copying or moving any files.

Let's take a look at the Documents library and see what features are new. In the Documents library folder, there is a new Documents library pane at the top of the window where you can rearrange the folder structure.
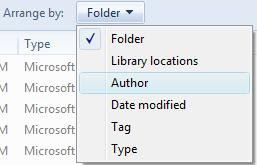

If you were looking for documents created by a particular author, you can choose to arrange your folder structure by Author, and hey presto, the Documents library window stacks all your files by author.

This is great, but what else can it do? And how can this help me? Well for me, saving documents to the desktop is an easy way to open and grab files when I need to, I’m unorganised I know! In Windows 7 tidying up messy documents is easy; you can simply drag them from your desktop for example, and drop them into the Documents library window, and when in the Arrange by Author category, Windows Explorer creates the new author stacks.

You do need to make sure that you remember to add relevant document details such as the author etc in order for the, arrange by filters to be most useful.


You can switch back to the Arrange by Folder view, which is a classic view, to look at a list of your folders, or choose from other views that are most appropriate to your needs.

You can manage folders in your library by clicking the Library Locations button. I want to view a collection of all my music in the Music library, so the first step would be to click Library Locations in my Music library window.

In the Music library window you can add folders from your computer or from an external drive to your Music library. You can also decide which folder will be the default save folder for the library. The default save folder in a library is the location where if you save a document to a specific library, by default, it will be saved in the default save folder.

For those of you that store music on a secondary partition, or an external drive, or both, can now have access to all your music in one place without copying everything into the one folder. Simply click Add, and then navigate to the required folder / drive that your music is stored on. Now in your Music library folder, you will see a collection of all your gathered music. You can do everything with your music that you could do before, click play, click next / previous, and listen to songs.

Unfortunately if you disconnect your external drive from your PC, you will be unable to continue listening to music in your Music library, this is a little annoying, but if your music is stored on your computer somewhere or on another partition, as long as you have established the location, you can still listen to your music in the Music library.

The same principle applies to all your libraries including any new libraries that you want to create, you can gather documents or videos etc from anywhere on your computer by adding folder locations to your desired library.


Homegroup

A homegroup is a new feature in windows 7 that is a way of setting up several computers on a home network, and sharing files with other homegroup members. Only members in your homegroup can view files on your computer, and gaining access to the homegroup network requires a secure password.

Setting up a homegroup in Windows 7 does not require any of the hassle and technical knowledge that is required to set up sharing in Vista. Once you have configured homegroup, you can view homegroup members in Windows Explorer, and here you can drag and drop files into the folders of members who are connected to your homegroup. This is a fantastic way to share files, and it’s easy. You don’t even need to worry about permissions, as Windows 7 have developed the Windows Explorer so that you have private and public libraries.


Before you go ahead and set up a homegroup network, your home computers network location should be set to Home network. Follow these simple steps to set your Windows 7 home computer network location to Home network: -


Setting the Network Location

  1. Click the Start menu.

  2. Click Control Panel.

  3. Click Network and Internet.

  4. Click Networking and Sharing Centre.

  5. In the View your active networks section, underneath your network name, click on the network location link.

  6. In the Set Network Location dialog box, click Home network.


Your network location is now a Home network, and you can set up a homegroup network.

Setting up a homegroup network is also simple, you can set up a homegroup network on a Windows 7 computer at home, by following these simple steps: -

Creating a Homegroup Network
  1. Click the Start menu.

  2. Click Control Panel.

  3. Click Network and Internet.

  4. Click Networking and Sharing Centre.

  5. In the Change your network settings section, click Set up sharing with homegroup.

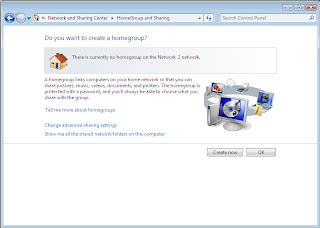
  6. In the Do you want to create a homegroup? window, click Create now.


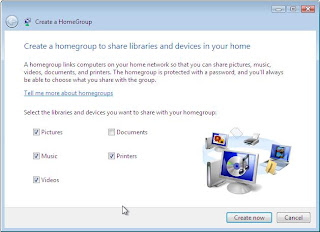
  7. In the Create a HomeGroup window, select the library check boxes that you want to share out, and then click Create now.


  8. In the Use this password to add other computers to your homegroup window, jot down the password, and then click Finish.
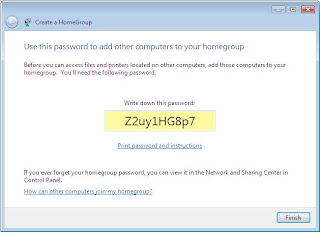


You have now successfully created a homegroup network!

Finally, you now need to set up other home computers so that the network locations are set to Home network. By doing so, this will enable you to be able to join the homegroup network that you just created. Follow the Setting the Network Location steps above to set your other home computer network location to Home network.

Joining a Homegroup Network

  1. Click the Start menu.

  2. Click Control Panel.

  3. Click Network and Internet.

  4. Click Networking and Sharing Centre.

  5. In the Change your network settings section, click Set up sharing with homegroup.

  6. In the Do you want to join a homegroup? window, click Join now.
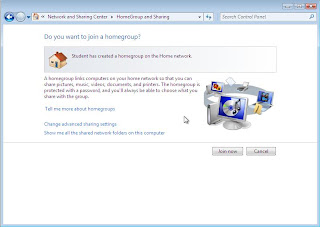


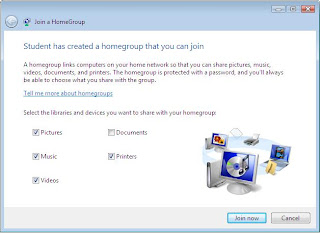
  7. In the Computer name has created a homegroup that you can join window, select the library check boxes that you want to share, and then click Join now.


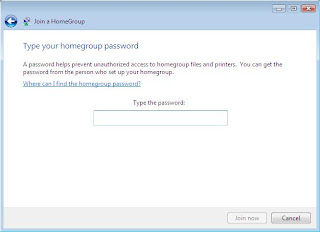
  8. In the Type your homegroup password window, type the homegroup network password, and then click Join now.


  9. In the You have joined the homegroup window, click Finish.
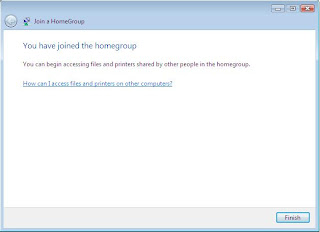


You have now successfully created and joined a homegroup!

To get sharing, open Windows Explorer, and in the navigation pane, click Homegroup. You can now click on the user in your homegroup, open / edit / delete documents (if these permissions are enabled) and even drag and drop documents into homegroup user's folders.
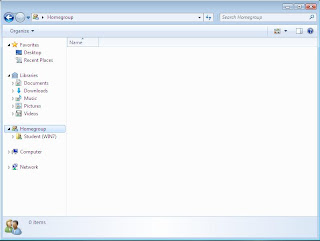

Homegroup is a great way to share you files, and also be more in control. You may notice that the folder structure in Windows 7 differs from that of previous windows OS's, and this is all to do with homegroups.

In Windows Explorer, you have private and public folders for all your libraries. Both folders have different permissions set so that you can manage them in the correct manner. You can also customise them so that the permission settings are exactly what you want. This means that you can make sure your personal folders are kept personal, and you public folders are kept public.

I think that libraries and homegroup are great additions to the new Windows OS, they make the experience much more user friendly and now anyone can use libraries and set up a homegroup and get sharing straight away.


I will be taking a look at Internet Explorer 8 next and I will be posting some more blogs and keeping you updated on what's new :)