Monday 23 July 2012

PowerPivot and Power View in Excel 2013

(cross-posted from The Blog at Graemesplace)

It’s just typical of my job that just a few short weeks after the publication of some Microsoft Official Curriculum courses that I’ve spent months working on, Microsoft should choose to make a preview of the next release of the software on which they are based  available! As you may know, we recently published courses 10778A and 40009A, both of which  make use of the PowerPivot and Power View features in Excel and SharePoint 2010; so it was with a  certain amount of trepidation that I installed the preview of Office 2013 to get a  first look at the enhancements that have been made.

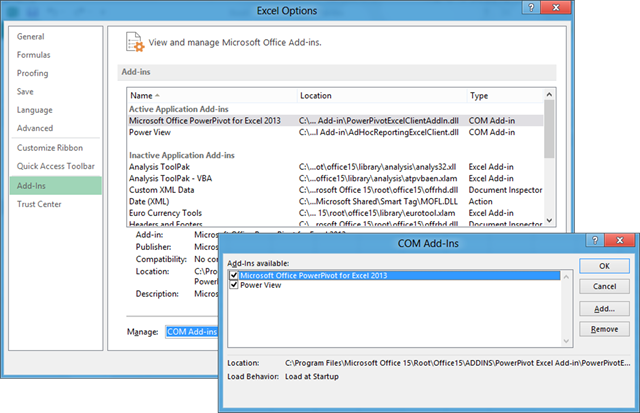
The first, and most obvious, change is that the PowerPivot  add-in for Excel no longer needs to be installed from a separate package. It’s built into Excel and only needs to be enabled, which you do by configuring the COM Add-ins in Excel’s options as shown here.

Picture1

Note that there’s also a Power View add-in – more about that later!

After the PowerPivot add-in has been enabled, users will see the POWERPIVOT tab on the ribbon, as shown here.

Picture2

With this ribbon, you can not only manage a PowerPivot tabular data model for the workbook as you can in Excel 2010, but you can also create calculated fields and KPIs without having to directly edit the model – making the process a little bit more intuitive for information workers.

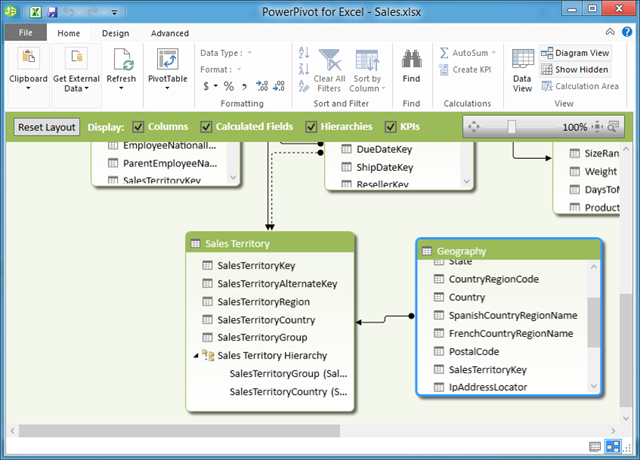
Clicking Manage opens the PowerPivot window, which is similar to that of the previous release. There are a few enhancements of course, but anyone familiar with PowerPivot in Excel 2010 will find themselves in familiar territory. In this case, I’ve opened a PowerPivot workbook I created with Excel 2010 based on data in the AdventureWorksDW SQL Server sample database. The changes to this release meant that I was prompted to allow Excel to update the data model and re-save the workbook, so one thing to be aware of is that you can open (and update) Excel 2010 PowerPivot workbooks in Excel 2013, but after they’ve been updated you won’t be able to open them in Excel 2010. You can see the diagram view of my PowerPivot data model below – note that it includes a hierarchy in the Sales Territory table.

Picture3

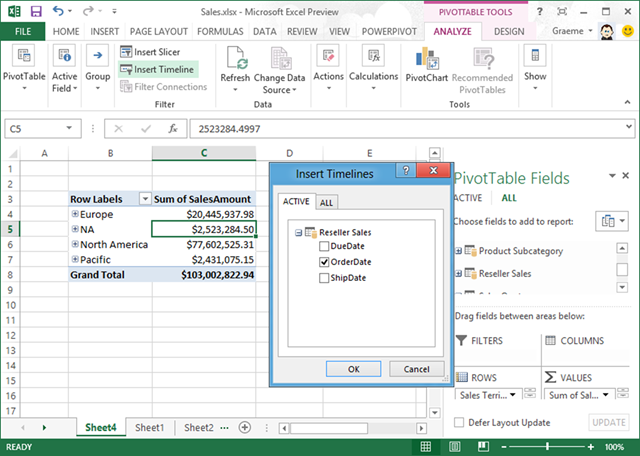
After you’ve created the data model in your workbook, you can use it as a source for PivotTables, just as you could in Excel 2010. There are however, one or two nice enhancements on a new ANALYZE tab of the ribbon that make it easier to do things like create slicers. Another new feature is the ability to create timeline filters that make it easier to analyse data based on chronological periods. To add a timeline, just click Insert Timeline and specify any of the time-based attributes that Excel identifies as having a suitable relationship in the model.

Picture4

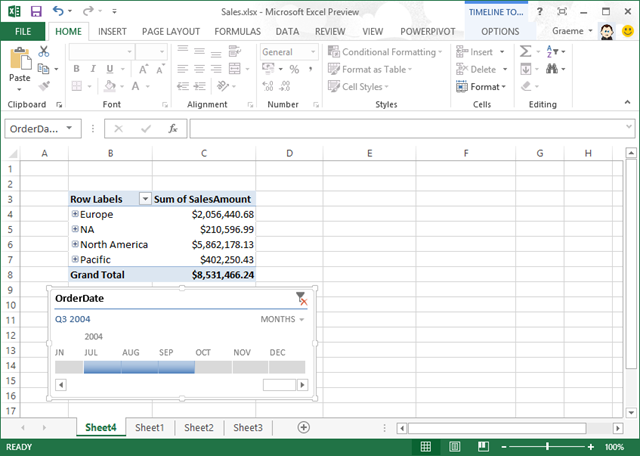
After you’ve inserted a timeline, you can use it to filter the data in the PivotTable as shown here.

Picture5

Earlier, I mentioned that Excel 2013 includes a Power View add-in. This enables information workers to create Power View reports from the data model in the workbook (and external data sources). Previously, Power View was only available in SharePoint Server 2010, but in Office 2013 you can use it right there in an Excel workbook.

To create a Power View report from the data model in the workbook, just click Power View on the INSERT tab of the ribbon.

Picture6

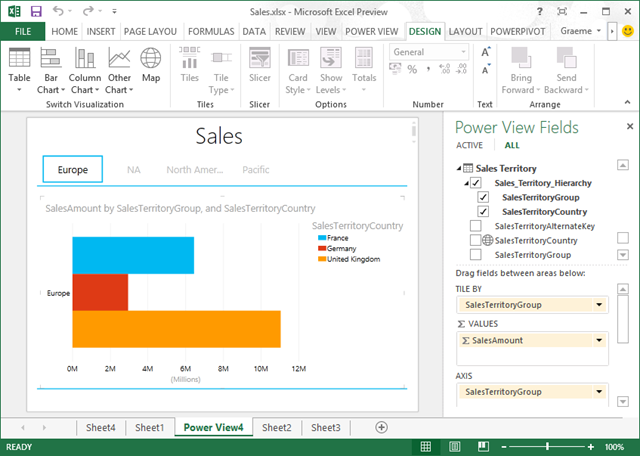
If necessary, you’ll be prompted to install Silverlight (which is required by the Power View add-in), and after doing so you’ll be able to create a Power View report from the data in your PowerPivot data model as shown here.

Picture7

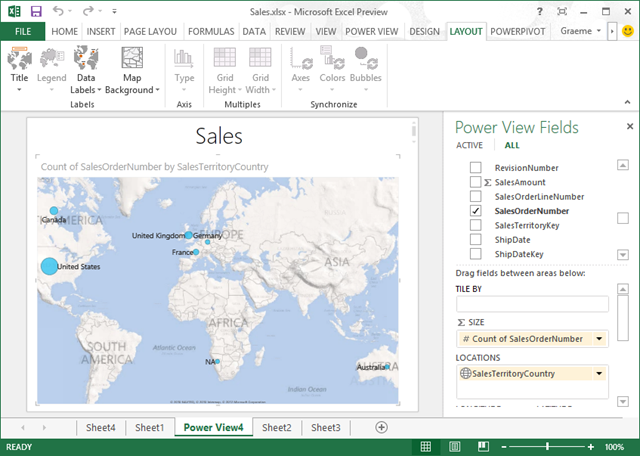
Note that you can include hierarchies in a Power View report, which wasn’t supported in the previous release. There are several other enhancements in this release, including support for new data visualizations (such as pie charts), and even visualization of geographical data on a Bing Maps map, as shown here.

Picture8

This short article just highlights a few of the improvements to PowerPivot and Power View in Excel 2013. There are many more new features in Excel, as well as greater ability to share BI capabilities across the enterprise through enhancements in SharePoint 2013 and SQL Server 2012 SP1, which I look forward to exploring in more depth.

Monday 9 July 2012

Developing Metro Apps using C++/CX

For most of the year I’ve been developing a Windows 8 Metro app, in C++/CX, with the Patterns and Practices team. As we near the release of the app I thought it would be useful to provide some background on C++/CX. Earlier in the year I wrote an article for the MSDN Flash UK newsletter, that demonstrates the ease of use of C++/CX for writing Windows 8 Metro applications through a sample application that enumerates the Windows 8 Pictures library, and displays thumbnails for each picture.

WinRT is the framework and library for building Windows 8 Metro applications. It can be used from C++, as well as JavaScript and .NET languages. It’s built on COM, and while working with COM has traditionally been difficult, WinRT has made the process very straight forward.

Developing a Windows 8 Metro application using C++ gives you the advantages of programming in both C++11 and C++/CX. C++11, formerly known as C++0x, is the name of the most recent iteration of the C++ programming language. It includes additions to the core language and also extends the C++ standard library. C++/CX (Component Extensions) is a set of extensions that makes it to easy to consume WinRT functionality from C++. It looks like C++/CLI but its native code, being COM under the covers rather than .NET. In addition, C++/CX hides all the COM, making programming WinRT straight forward.

For more information, see Developing Metro Apps using C++/CX, for C# developers.

How to: Build Testable Windows Phone Applications

An earlier post outlined the Building Testable Windows Phone Applications guidance I’d developed with Patterns and Practices. At the time of release of this guidance I wrote an article for the MSDN Flash UK newsletter, that demonstrates how to build a testable Windows Phone application that consumes accelerometer data.

The key to building testable Windows Phone applications is to abstract the classes in the Windows Phone SDK. An interface can be generated for the required class in the Windows Phone SDK that contains the desired functionality for your application. Adapters, which are wrapper classes that implement the generated interface, can also be generated. Adapter classes pass parameters and return values to and from the underlying Windows Phone SDK class. The adapter translates calls to its interface into calls to the original interface. Creating adapters enables you to write loosely coupled testable code.

For more information, see How to: Build Testable Windows Phone Applications.

Building Testable Windows Phone Applications

Last year I worked with Patterns and Practices to develop a number of pieces of guidance concerning Windows Phone development. One of the items was Building Testable Windows Phone Applications.

This guidance shows you how to build testable Windows Phone applications that:

  • Consume location data
  • Perform navigation
  • Persist data to and from isolated storage
  • Consume sensor data
  • Use a chooser to take a photo

The guidance includes a series of accompanying sample applications. You can download these sample applications and run them on your own computer to see how they work, and to experiment and reuse the code. In addition, there is an accompanying NuGet package for the guidance. The Microsoft.Practices.Phone.Adapters.Source package contains interfaces, and adapter and facade implementations of the interfaces, which mirror functionality in several classes in the Windows Phone 7.1 SDK.

For more information, see Building Testable Windows Phone Applications.

Developing a Windows Phone Application using the MVVM Pattern

Last year I worked with Patterns and Practices to develop a number of pieces of guidance concerning Windows Phone development. One of the items was Developing a Windows Phone Application using the MVVM Pattern.

This guidance shows you the basics of MVVM and dependency injection through a sample application, PetrolTracker, that enables you to track the petrol consumption of three vehicles. The sample application is authored two different ways so that you can see the progression from a code-behind implementation, to a view model implementation whose dependencies are injected. Some of the topics that you will learn about include the following:

  • Application Launching Events
  • Saving and Restoring Page State
  • The Motivation for MVVM
  • The MVVM Pattern
  • The Benefits of MVVM
  • Connecting View Models to Views
  • Dependency Injection
  • Invoking Commands from a View
  • Invoking Navigation from a View
  • Displaying User Interface Notifications
  • Abstracting the Windows Phone 7.1 SDK
  • Unit Testing MVVM Applications

For more information, see Developing a Windows Phone Application using the MVVM Pattern.

Developing an Advanced Window Phone 7.5 App that Connects to the Cloud

Last year I worked with Patterns and Practices to develop a number of pieces of guidance concerning Windows Phone development. One such item has just been published as a book, and so I thought I’d summarize it here.

Developing an Advanced Windows Phone 7.5 App that Connects to the Cloud will show you how to design and implement a compelling end-to-end application using the Windows Phone 7.1 SDK. Some of the topics that you will learn about include the following:

  • Displaying user interface notifications
  • Using the MVVM pattern
  • Managing state and performing navigation
  • Encrypting and decrypting credentials
  • Persisting data to and from isolated storage
  • Synchronizing data between a Windows Phone device and a cloud service, both in the background and the foreground
  • Pinning Application Tiles and Secondary Tiles to Start
  • Capturing location data, image data, and audio data
  • Authenticating with a cloud service from a Windows Phone application
  • Pushing notifications to Windows Phone devices
  • Transferring data between a Windows Phone device and a cloud service
  • Abstracting the Windows Phone 7.1 SDK
  • Unit testing MVVM applications

This guide has an accompanying example application—the Surveys mobile client application for Windows Phone. You can download the application and run it on your own computer to see how it works and to experiment and reuse the code.

For more information, see Developing an Advanced Windows Phone 7.5 App that Connects to the Cloud.

Tuesday 3 July 2012

Matching Data with SQL Server 2012 Data Quality Services

(cross-posted from The Blog @ Graemesplace)

In  a previous post, I described how you can use Data Quality Services (DQS) to create a knowledge base for the domains (data columns) used in your business data and use it to cleanse data by correcting invalid or inconsistent values. Data cleansing is however only one side of the coin when it comes to DQS. You can also use DQS to perform data matching – in other words, finding records that potential duplicates of one another and consolidating them to a single surviving record.

When you think about it, the potential for duplicate data entry in most complex business environments is enormous. For example, let’s imagine an e-commerce site where customers need to register before placing orders. It’s perfectly conceivable that a customer who only uses the site occasionally might re-register with slightly different details because they’ve forgotten that they had registered previously or can’t remember their login credentials.  Even if the site applies a policy that demands a unique email address for each registration, there’s nothing to stop the same customer registering multiple times with different email addresses. For an individual sales order, the fact that the customer is registered multiple times is inconsequential – as long as the payment and delivery address details are correct, the order can be processed successfully. However, then the company wants to use its data to perform any kind of business intelligence (BI) reporting or analysis that aggregates information per customer, then the duplicate entries can lead to misleading results.

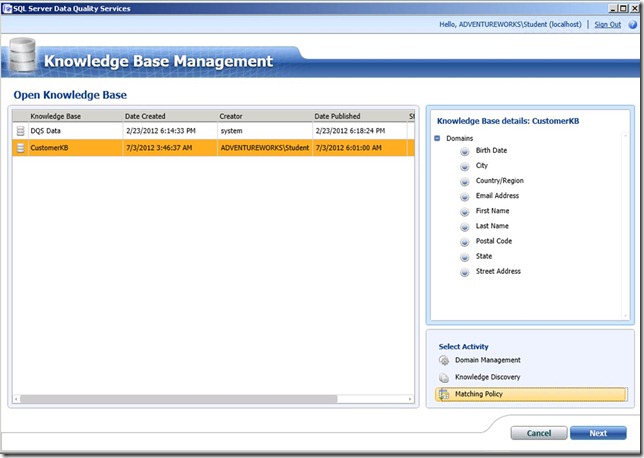
To use DQS to match data, you must first add a matching policy to a knowledge base. You can use an existing knowledge base that is also used for data cleansing, or you can create a knowledge base specifically for data matching. In this example, I’m opening an existing knowledge base that contains domains for customer records for the Matching Policy activity.

Picture1

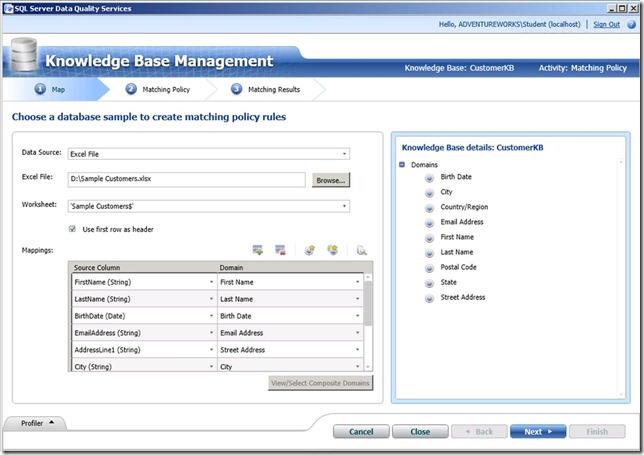
Just as when performing knowledge discovery, I need to map some sample data to the domains defined in the knowledge base. This enables me to test the matching policy against a known data set as I build it, and therefore verify that it successfully identifies known duplicate records. In this case, I’m using data in an Excel workbook as the source for my sample data, but you can also use a table in a SQL Server database.

Picture2

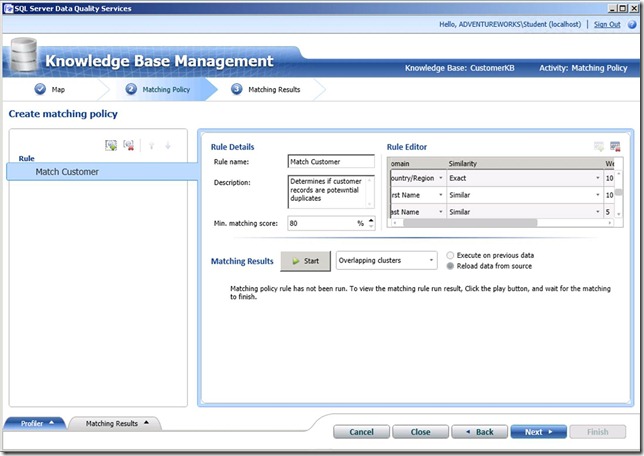
Having mapped sample data to the domains, I can now define the matching rules for my matching policy. You can include multiple rules, and each one uses a set of weighted comparisons of domain values to identify clusters of records that are potential duplicates of one another.

Picture3

Potential matches are determines based on a score that is calculated from the weighted comparisons you define in the rule. Here are the comparisons I’ve used in my Match Customer rule:

Domain Similarity Weight Prerequisite
Birth Date Exact  

X

Email Address Exact 20  
Postal Code Exact 10  
Country/Region Exact 10  
First Name Similar 10  
Last Name Similar 10  
Street Address Similar 20  
City Similar 10  
State Similar 10  

Note that an exact match of the Birth Date domain is specified as a prerequisite. In other words, only records where the birth date is an exact match will be considered as candidates for a potential duplicate. Prerequisite domains in a matching rule must use the Exact similarity and have no weighting value. All of the other domains are calculated based on an exact or similar match, and have weightings, which add up to a total of 100.

Assuming the birth date for the records being compared is a match, DQS then makes the other comparisons defined in the matching rule and adds the specified weighting value for each comparison that is true to produce an overall score. For example, consider two records with identical Birth Date values being compared using the Match Customer rule defined above. If the  Email Address domains for both records is an exact match, 20 is added to the score. If the First Name domains are similar (for example, “Rob” and “Robert”), another 10 is added to the score, and so on until all of the comparisons in the rule have been made. The resulting score is then compared to the minimum matching score defined for the matching rule (in this case 80). If the score exceeds the minimum matching score, then the records are considered a match. Multiple records that are considered matches for one another are grouped into a cluster.

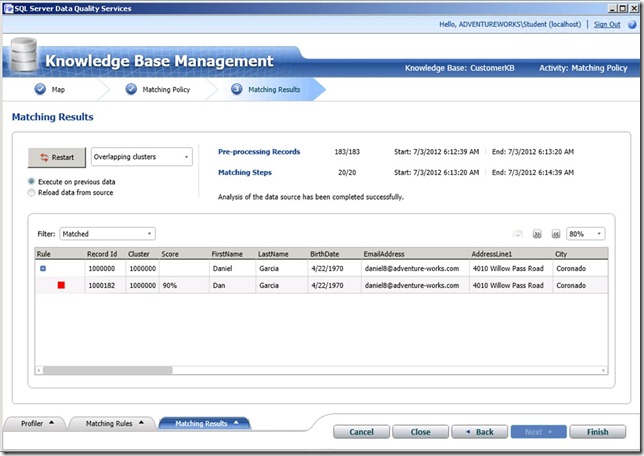
After you have defined the matching rules, you can use them to find matches in the sample data you mapped earlier. This gives you the opportunity to verify that the rules behave as expected against a known dataset. In this case, the dataset results in a single cluster of matches that includes two records – one for Daniel Garcia and another for Dan Garcia.

Picture4

Now that I’ve defined my matching policy, I can publish the knowledge base and allow the data stewards in my organization to use it for data matching.

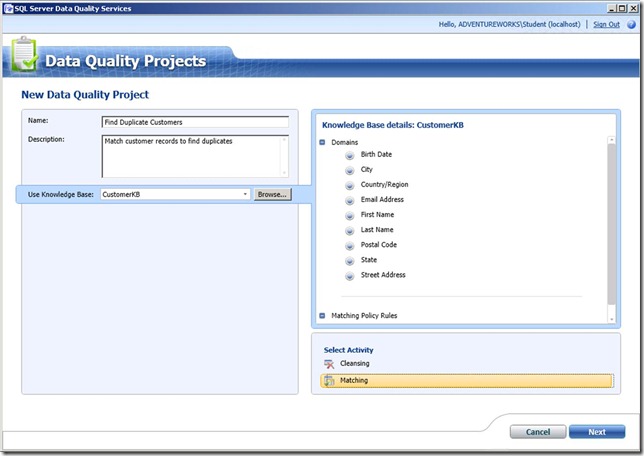
To use a knowledge base to perform data matching, create a new data quality project, specify the knowledge base, and specify the Matching activity as shown here.

Picture5

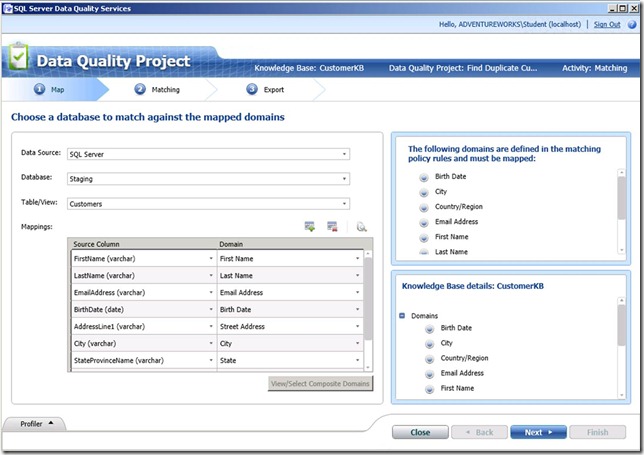
The first step, as it is in any DQS project, is to map the fields in your data source to the domains in the knowledge base. Just as before, the data source can be a table in a SQL Server database or an Excel file. This time, I’m using the Customers table in the Staging SQL Server database.

Picture6

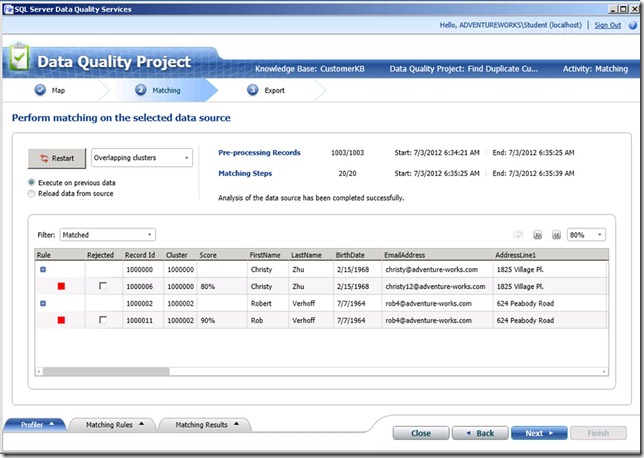
After you’ve mapped the domains, you can start the matching process. When the process is complete, the clusters of matched records is displayed. In this case, there are two clusters, each containing two matches. At tis stage, you can choose to reject any matches that you know aren’t duplicates.

Picture7

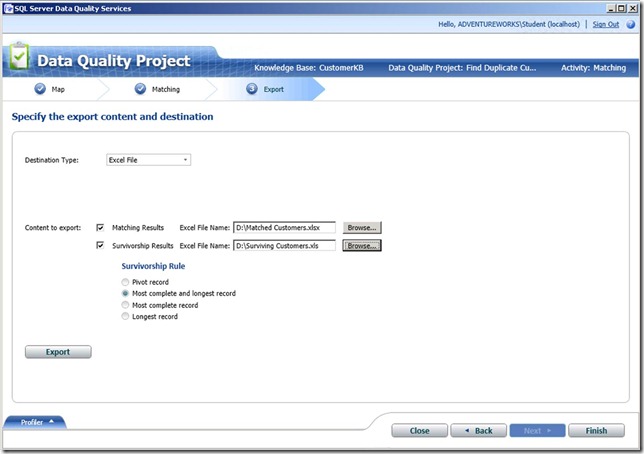
When the matches have all been identified, you can export the results to a SQL Server table or an Excel file. You can also export survivors (one record from each cluster that is chosen as the correct one) based on one of the following survivorship rules:

  • Pivot record – A record in the cluster that is chosen arbitrarily by DQS.
  • Most complete and longest record – The record that has the fewest null field values and the longest overall data length.
  • Most complete record – The record that has the fewest null fields.
  • Longest record – The record that has the longest overall data length.

Picture8

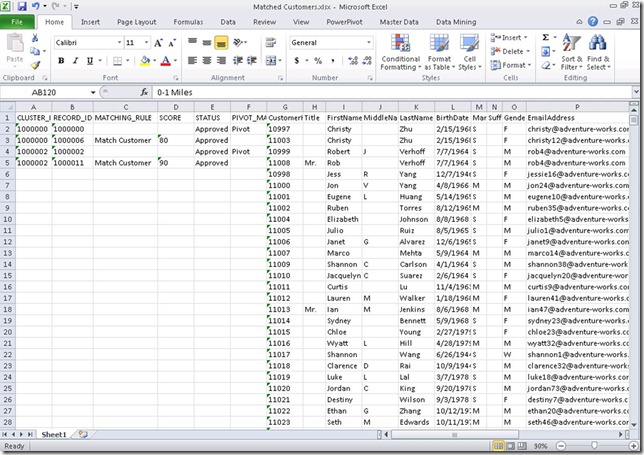
The exported results include all of the source data with additional columns for the clusters of matching records to indicate the matching rule used and score calculated for each match, and the pivot record for each match cluster.

Picture9

The exported survivors contain all of the non-matching records from the original data source and one version of each matched record based on the survivorship rule you selected. In the following example, I’ve highlighted the surviving records from my matching process.

Picture10

In some case, you can simply replace the original data set with the survivor records to create a de-duplicated set of records. However, in most business scenarios you’ll need to apply some logic (manual or automated) to handle relationships between duplicate records and other tables. For example, before I eliminate the duplicate customer records identified by the matching process in the above example, I would need to reassign any sales orders that are currently related to those customer records to the surviving records.

Hopefully you’ve found this brief introduction to data matching with DQS useful. To learn more about DQS and its use in a data warehousing solution, you can attend Microsoft Official Curriculum (MOC) course 10777A: Implementing a Data Warehouse with SQL Server 2012.