There are often times when it's useful to draw attention to particular items in a SharePoint list or library. For example, you might want to highlight overdue tasks, colour-code items according to priority, or draw attention to undesirable information. In other words, you want to apply conditional formatting based on field values. Now, as you probably know, SharePoint 2010 uses XSLT-based list views by default. By editing the XSLT for a list view you can apply all manner of rules and conditional formatting. Even better, SharePoint Designer 2010 includes some built-in tools that will figure out the XSLT for you. In the List View Tools tab group, on the Options tab, there's a handy dropdown menu:
In most cases, you're probably going to want to apply conditional formatting by row. First you set your conditions:
Then you choose the styles you want to apply when the conditions are met.
When you've set your style, SharePoint Designer modifies the XSLT so that your formatting is rendered as an inline style on the row (<tr>) element when your conditions are met. I've stripped out some of the less relevant attributes to improve readability.
<tr>
<xsl:attribute name="style">
<xsl:if test="normalize-space($thisNode/@Status1) != 'Published'
and ddwrt:DateTimeTick(ddwrt:GenDisplayName(
string($thisNode/@Target_x0020_Pub_x0020_Date1)))
<= ddwrt:DateTimeTick(ddwrt:GenDisplayName(
string($Today)))">
background-color: #FFD7D7;
color: #FF0000 !important;
font-weight: bold;
</xsl:if>
...
So far so good. Everything looks correct in SharePoint Designer. However, if you've tried this, you might have found that when you load the list view in the browser you get mixed results – in particular:
- Changing background colours and text decorations (such as bolding or italics) works fine.
- Changing fonts or font colours works in SharePoint Designer but doesn't work in the browser.
A quick web search revealed that I'm not the first person to encounter this, and I've yet to see a definitive answer, so here goes.
Short version – the problem is down to the way the default styles are structured in corev4.css. Row styles do not cascade down to individual cells (regardless of whether you append an !important flag). If you want to change the background colour, apply conditional formatting at the row level. If you want to change the font colour, and you don't fancy messing around with CSS, apply conditional formatting at the column level.
Long version – read on for a more detailed explanation…
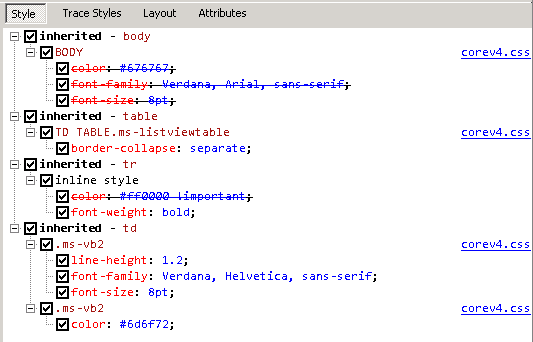
Using IE Developer Tools, you can take a look at how styles are applied to individual HTML elements on the page. The XSLT rule created by SharePoint Designer applies an inline style to a row (tr) element. If we use IE Developer Tools to look at how the row is styled, we can see that everything looks correct – the inline style takes precedence:
However, if we look at how the text within one of the individual cells is styled, you can see that our inline style at the tr level is getting overridden by a more specific style, defined by the ms-vb2 class, at the td level.
Unfortunately there's not much we can do about this. If you want to modify any of the styles defined by the ms-vb2 class, such as font, font size and font colour, you need to create a column-level rule rather than a row-level rule. The two types of rules work in exactly the same way in SharePoint Designer—when you create a column-level rule, you can still set conditions based on any field value, not just the column to which you are applying the conditional formatting. If you want to conditionally change the font colour of an entire row, you simply create a column-level rule on every column. This time, SharePoint Designer modifies the XSLT so that your formatting is rendered as an inline style on the column (<td>) element when your conditions are met:
<td>
<xsl:attribute name="style">
<xsl:if test="ddwrt:DateTimeTick(ddwrt:GenDisplayName(
string($thisNode/@Target_x0020_Pub_x0020_Date1)))
<= ddwrt:DateTimeTick(
ddwrt:GenDisplayName(string($Today)))">
color: #FF0000;
</xsl:if>
</xsl:attribute>
...
This time the browser will render the view as expected. The following image shows the results of a column-level rule on the Target Pub Date column, in addition to the row-level rule described earlier.
If we take a look at the CSS, we can see that our inline column style is overriding the styles provided by ms-vb2.
In summary, there's no real difference between row-level conditional formatting and column-level conditional formatting, other than the scope at which your inline styles are applied. In practice you may often need to use a combination of the two in order to realise a particular style or effect.


No comments:
Post a Comment