Wednesday, 23 May 2012

Enterprise Deployment Tutorial Series Published

(cross-posted from Jason Lee's Blog)

Microsoft's web platform includes various tools and technologies which, together, give you a whole lot of control over your web deployment and ALM scenarios. Visual Studio tooling, MSBuild, the Web Publishing Pipeline, the IIS Web Deployment Tool (Web Deploy), VSDBCMD.exe, the Web Farm Framework, and other tools can all work together to give you some really powerful and flexible deployment solutions. The problem has always been that these tools are documented individually, and if you want to figure out how to use them together then you've got your work cut out.

Until now, that is :-)

Over the past six months, I've been working with Tom Dykstra and Sayed Ibrahim Hashimi at Microsoft to create some tutorials on web deployment in the enterprise. I'm pleased to announce that we've now published the series, Deploying Web Applications in Enterprise Scenarios, to the www.asp.net website.

The tutorial series is huge - over 60,000 words - and covers many different aspects of enterprise-scale web deployment. Throughout the authoring process, our aim was to provide holistic, end-to-end guidance on how to meet common deployment requirements, rather than simply focusing in on individual tools. Some of my personal highlights are:


Do take a look, and I hope you find the tutorials valuable.

Saturday, 7 April 2012

Cleansing Data with SQL Server 2012 Data Quality Services

(cross-posted from The Blog @ Graeme’s Place)

I’ve been a bit quiet on the blogging side of things for a while, and in my defence I’ve been pretty heads-down working as a vendor for Microsoft as the lead author for a couple of new courses on SQL Server 2012 data warehousing and BI (courses 10777A and 10778A if you’re interested). As part of this work, I’ve been exploring the new data cleansing capabilities in SQL Server 2012 Data Quality Services (DQS). This article is a simple walkthrough of how to use DQS to cleanse data as part of an Enterprise Information Management (EIM) or Extract, Transform, and Load (ETL) solution.

So, what is data cleansing all about then? Well, most people involved in building or managing data-driven applications and BI solutions will have come across the problem of inconsistent or invalid data values for columns (or “domains”) that are used for business analysis. For example, let’s suppose your database stores customer data, including the customer’s address; and you you want to count customer sales by country. When customers or sales employees enter customer data into the system, it’s perfectly possible (and actually quite likely given a large enough volume of customers) that some values will be either entered incorrectly (for example “Unted States” instead of “United States”) or inconsistently (for example, some customers may enter “United States”, some others may enter “USA”, and others still may enter “America”). When you try to aggregate sales, you’ll end up with inaccurate counts because there are several values in use for the same country.

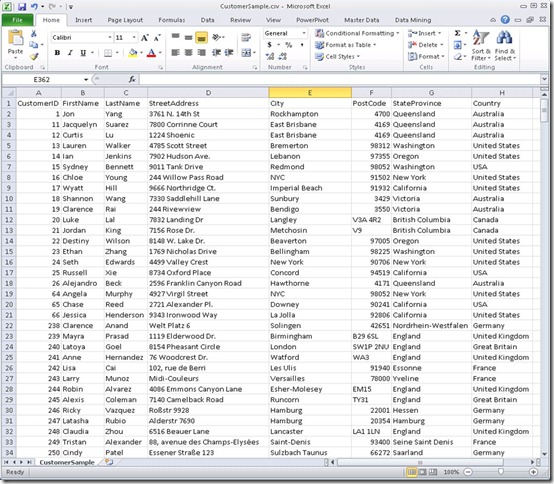
Here’s an Excel workbook containing a subset of data extracted from a SQL Server database table to show some typical data quality problems.
Picture1

Note that the data contains a number of problems, including:

  • The City column contains “New York” and “NYC” for New York City.
  • The Country column contains “United States” and “USA” for the US.
  • The Country column also contains “United Kingdom” and “Great Britain” for the UK.

DQS enables you to address this problem by cleansing the data based on a known set of values and rules for the key domains (columns) that exist in your datasets. The way that DQS does this is by enabling you to create and maintain a knowledge base that contains the known valid values for a related set of domains, along with validation rules (for example, an EmailAddress value must include a “@” character)  and common synonyms can be corrected to a leading value (for example, by correcting “USA” and “America” to the leading value “United States”). After you have created a knowledge base, you can use it to cleanse any data that includes the same domains (so for example, if you create a knowledge base for geographical domains such as City, State, and Country, you can use it to cleanse any data that includes these fields – such as customer data or employee address data. SQL Server 2012 includes the Data Quality Services Client tool (shown below), which you can use to create, maintain, and use DQS knowledge bases.

Picture2

When you create a new knowledge base, you can do so from scratch, or you can use an existing knowledge base as a starting point. SQL Server 2012 ships with a pre-existing knowledge base for US-based demographic data named DQS Data, and in this example, I’ll use it as the basis for my own CustomerKB knowledge base as shown below.

Picture3

The DQS Data knowledge base includes a number of pre-defined domains, as shown in the image above. I only need some of these domains, and I’ll need to add some additional ones that are specific to my own data; so I’ve initially selected the Domain Management activity as I create the CustomerKB knowledge base. I only intend to use the Country/Region, US – Last Name, and US – State domains from the DQS Data knowledge base, so I’ll delete the others. The domains I’m retaining contain official values for country and US state names, and common last names (surnames) based on US demographic data such as the 2000 US census.

Picture4

Since my customer data includes records for customers all over the world, I’ll rename the domains in my knowledge base to remove the “US” prefix. I’ll also add a new domain named City so that I can validate city names in the data.

Picture5

Note that I can select each domain and view the known values that are currently defined in the knowledge base as shown below. The City domain has no known values (because I’ve just created it), and the others have inherited values from the DQS Data knowledge base. The image below shows the known values for the Country/Region domain. Note that the knowledge base defines leading values for each country (such as “Afghanistan”) and synonyms that, while valid in their own right, should be corrected to the leading value to ensure consistency.

Picture6

I’ve now completed my initial knowledge base, so I’m ready to finish the domain management activity. Clicking Finish produces a prompt to publish the knowledge base as shown below, but before I’m ready to use it I want to populate the known values for the City domain from my existing data by performing some knowledge discovery; so I’ll click No.

Picture7

Knowledge Discovery is an activity in which you connect to a data source and map fields in the source to domains in the knowledge base. DQS can then use the data source to discover new values for the domains defined in the knowledge base. The first step in this process is to open the knowledge base for the Knowledge Discovery activity as shown here. Note that the activity is performed using a wizard interface, with a sequence of steps.

Picture8

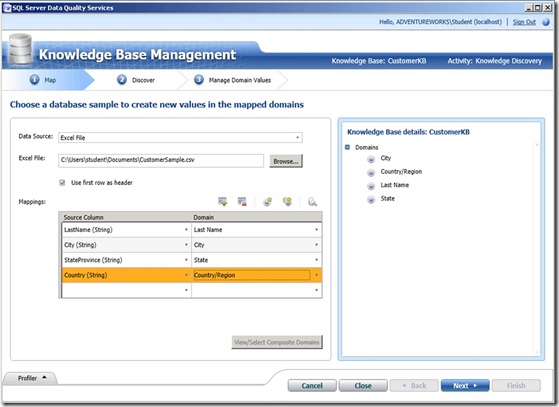
After opening the knowledge base, I need to select a data source (I’m using the Excel workbook we saw earlier), and map the columns in the data source to the domains in the knowledge base as shown below. Note that the data source can include columns that are not mapped to domains, and does not need to include a column for every domain in the knowledge base. However, only the mapped domains will be included in the knowledge discovery process.
Picture9

On the next page, I can start the data discovery analysis. DQS will read the source data and identify new values for the domains in the knowledge base, as shown here.

Picture10

On the final page of the wizard, you can view the values that have been discovered for each domain. In this example, the values discovered for the City domain include New York and NYC, as shown below. I can identify these as synonyms by selecting them both and clicking the Set selected domain values as synonyms button.

Picture11

The value I selected first becomes the leading value, as shown here.

Picture12

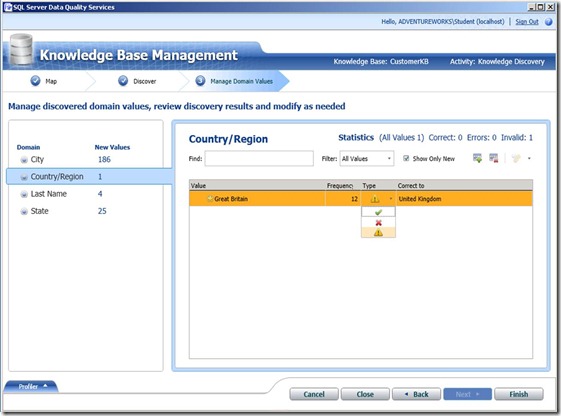
For the Country/Region domain, DQS has discovered a new “Great Britain” value. I can mark this as invalid and specify an existing value to which it should be corrected (in this case, “United Kingdom”).
Picture13

Clearing the Show Only New checkbox reveals the values that already existed before knowledge discovery, and I can see that “Great Britain” is now under the “United Kingdom” leading value. I can also see that there were 151 instances of the existing “United States” value found, along with a further 42 instances of “USA”, which was already specified as a synonym for “United States”.

Picture14

Now I’m ready to finish the knowledge discovery activity and publish the knowledge base.

After you have published a knowledge base, you can use it to cleanse data from any data source containing columns that can be mapped to the domains defined in it. The simplest way to do this is to create a new data quality project based on the knowledge base and specify the Cleansing activity, as shown here.

Picture15

Again, the activity takes the form of a wizard with sequential steps. The first step is to map the columns in the data source to the domains in the knowledge base, just as I did when performing the knowledge discovery activity previously; only this time I’m using the full Customers table in my CustomerDB SQL Server database instead of the sample data I had extracted to Excel.

Picture16

Next, I run the cleansing process and DQS applies the knowledge base to the source data to identify corrected and suggested values. Corrected values are corrections DQS makes to the data based on known rules and synonyms. Suggested values are further possible corrections or new values that are generated based on a number of data quality heuristics that DQS uses when analyzing data.

Picture17

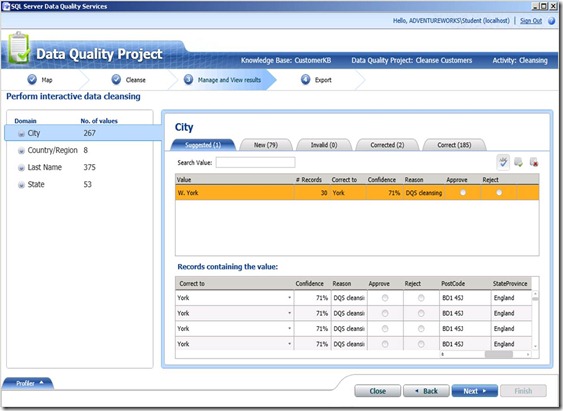
On the next page, on the Suggestions tab for each domain, I can view the suggestions identified by DQS. Here, DQS has identified a City domain value of "W. York”, which is sufficiently similar to the known value “York” for a correction to be suggested. Note that I can select the value and view the records that contain it to verify that “W. York” is commonly being used to denote “York” in England (as opposed for example, to “New York” in the United States). I can then choose to approve or reject individual instances of the correction, or accept/reject the suggestion that “W. York” should be considered a synonym of “York” (if I approve the suggestion) or added as a new known value in its own right (if I reject the suggestion).
Picture18

On the New tab, I can view the new values that were discovered for the domain. In this case, a number of new values were identified for the City domain, including Bracknell in England.

Picture19

On the Corrected tab, I can view the values that were corrected based on pre-existing known synonyms or suggestions that I have approved.

Picture20

After reviewing the results of the cleansing activity, I can export the cleansed data to a SQL Server database table, and .csv file, or an Excel workbook. Note that I can choose to export just the cleansed data values or I can include the cleansing information for further analysis.

Picture21

The exported results are shown in the following image. Note that the results include all of the source columns, and that for each of the columns that was mapped to a domain there are five columns in the results: The source value, the output value, the reason for any corrections, the level of confidence (between 0 and 1) for the correction, and the status of the column (correct or corrected).

Picture22

By creating a data cleansing project, a business user who understands the data domains can act as a “data steward” and enforce the quality of the data in application databases or analytical and reporting systems. Additionally, when you are confident in the ability of your knowledge base to cleanse data, you can incorporate DQS data cleansing into a SQL Server Integration Services (SSIS) data flow that extracts data from a source as part of an ETL process for data warehousing or EIM. The following image shows an SSIS data flow that includes the DQS Cleansing transformation.

Picture23

In this example, the CustomerDB data source uses an OLE DB connection to extract data from the Customers table in SQL Server. The DQS Cleansing transformation is then configured to use the CustomerKB knowledge base and map the appropriate columns from the data source to domains for cleansing, as shown here.
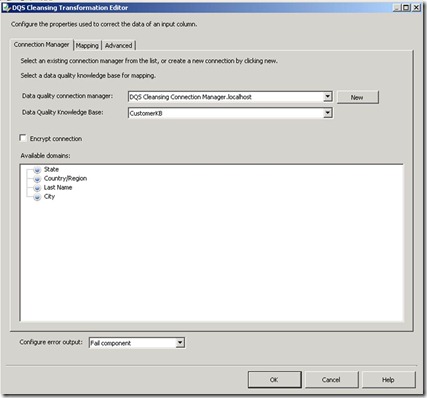
Picture24     Picture25

The Staging DB destination uses an OLE DB connection to load data from the data flow into a staging table as part of an ETL process for a data warehousing solution. The output columns for the mapped domains are used to load the cleansed values into the staging table, as shown here.

Picture26

Running the SSIS package extracts the source data, applies the DQS knowledge base to cleanse the mapped columns, and loads the cleansed data into the staging database as shown here.

Picture27

This walkthrough provides a simple example of how you can use DQS to cleanse data and improve data quality for reporting and analysis. There are a number of additional features of DQS that are not shown here, including the ability to define composite domains that consist of multiple columns and the ability to include external reference cleansing data from the Windows Azure Data Market in your knowledge base (for example to apply post code validation and correction rules based on standard data from a postal service authority). You can learn more about using DQS to cleanse data by attending course 10777A: Implementing a Data Warehouse with SQL Server 2012.

Wednesday, 15 February 2012

Running PowerShell Scripts on Remote Machines from MSBuild

Cross-posted from Jason Lee's Blog

Today's tricky topic is how to get a PowerShell script to execute on a remote machine from a custom MSBuild project file. I won't go into scenarios here, let's get straight to the point. Most of the difficulties encountered in this area revolve around handling parameters, managing paths with spaces, and escaping special characters.

Let's say we have a PowerShell script named LogDeploy.ps1 (it's trivial, but I basically want a test case that needs more than one parameter value). This contains a simple function that writes a single-line entry to a log file:
 
function LogDeployment
{
param([string]$filepath,[string]$deploydestination)
$datetime = Get-Date
$filetext = "Deployed package to " + $deploydestination + " on " + $datetime
$filetext | Out-File -filepath $filepath -Append
}
LogDeployment $args[0] $args[1]

The LogDeploy.ps1 script accepts two parameters. The first parameter represents the full path to the log file to which you want to add an entry, and the second parameter represents the deployment destination that you want to record in the log file. When you run the script and provide the required parameter values, it adds a line to the log file in the following format:

Deployed package to TESTWEB1 on 02/11/2012 09:28:18

So how do we run this script on a remote machine? You need to use the Invoke-Command cmdlet. From a PowerShell window, you'd use the following syntax:

Invoke-Command –ComputerName 'REMOTESERVER1'
               –ScriptBlock { &"C:\Path With Spaces\LogDeploy.ps1"
                               'C:\Path With Spaces\Log.txt'
                               'TESTWEB1' }

(There are various other ways of running a script using Invoke-Command, but this is the most painless approach when you need to manage parameters and deal with reserved XML characters, as you'll see shortly.)

If you wanted to run your PowerShell instructions from a regular command prompt, you'd need to invoke the PowerShell executable and provide your PowerShell commands through the -command argument:

powershell.exe –command
  "& {Invoke-Command –ComputerName 'REMOTESERVER1'
                     –ScriptBlock { &'C:\Path With Spaces\LogDeploy.ps1'
                                     'C:\Path With Spaces\Log.txt'
                                     'TESTWEB1' } "

The key points here are:
  • Wrap your command in double quotes and include an ampersand, i.e. &"your command".
  • Use single quotes preceded by an ampersand to enclose the path to your ps1 file, i.e. '&your path'.
(I'd tried many, many combinations of double quotes, single quotes, and ampersands before I arrived at this point.)

This brings us closer to the command we need to run from the MSBuild project file. However, there are a few additional considerations when you invoke this command from MSBuild. First, you should include the –NonInteractive flag to ensure the script executes quietly. Next, you should include the –ExecutionPolicy flag with an appropriate argument value. This specifies the execution policy that PowerShell will apply to your script and allows you to override the default execution policy, which may prevent execution of your script. You can choose from the following argument values:
  • A value of Unrestricted will allow PowerShell to execute your script, regardless of whether or not the script is signed.
  • A value of RemoteSigned will allow PowerShell to execute unsigned scripts that were created on the local machine. However, scripts that were created elsewhere must be signed. (In practice, you're very unlikely to have created a PowerShell script locally on a build server).
  • A value of AllSigned will allow PowerShell to execute signed scripts only.
The default execution policy is Restricted, which prevents PowerShell from running any script files.

Finally, you need to escape any reserved XML characters that occur in your PowerShell command:
  • Replace single quotes with '
  • Replace double quotes with "
  • Replace ampersands with &
When you make these changes, your command will resemble the following:

powershell.exe -NonInteractive -executionpolicy Unrestricted
               -command "& Invoke-Command
                 –ComputerName 'REMOTESERVER1'
                 -ScriptBlock { &'C:\Path With Spaces\LogDeploy.ps1'
                                ' C:\Path With Spaces\Log.txt ' 
                                'TESTWEB1' } "

The command is now in a format you can use from MSBuild. Within your custom MSBuild project file, you can create a new target and use the Exec task to run this command:

<Target Name="WriteLogEntry" Condition=" '$(WriteLogEntry)'!='false' ">
  <PropertyGroup>
    <PowerShellExe Condition=" '$(PowerShellExe)'=='' ">
      %WINDIR%\System32\WindowsPowerShell\v1.0\powershell.exe
    </PowerShellExe>
    <ScriptLocation Condition=" '$(ScriptLocation)'=='' ">
      C:\Path With Spaces\LogDeploy.ps1
    </ScriptLocation>
    <LogFileLocation Condition=" '$(LogFileLocation)'=='' ">
      C:\Path With Spaces\ContactManagerDeployLog.txt
    </LogFileLocation>
  </PropertyGroup>
  <Exec Command="$(PowerShellExe) -NonInteractive -executionpolicy Unrestricted
                 -command &quot;&amp; invoke-command -scriptblock {
                          &amp;&apos;$(ScriptLocation)&apos;
                          &apos;$(LogFileLocation)&apos; 
                          &apos;$(MSDeployComputerName)&apos;}
                          &quot;"/> 
</Target>

When you execute this target as part of your build process, PowerShell will run your script on the computer you specified in the -computername argument.

One final note - before you can use the Invoke-Command cmdlet to execute PowerShell scripts on a remote computer, you need to configure a WinRM listener to accept remote messages. You can do this by running the command winrm quickconfig on the remote computer. For more information, see Installation and Configuration for Windows Remote Management.

Tuesday, 20 December 2011

Deploying Databases with Object-Level Permissions

Cross-posted from Jason Lee's Blog

As I mentioned in my last post, we’re currently creating some guidance on deploying enterprise-scale applications. As we go along, I plan to blog about a few of the things that I find particularly tricky to figure out.
This time I want to look at database deployment. When you build a web application project in Visual Studio 2010, the Web Publishing Pipeline features allow you to hook into the IIS Web Deployment Tool (commonly known as “Web Deploy”) to package and optionally deploy your web application. As part of this process you can also deploy local databases to a target server environment. This is all nice and easy to configure through the project property pages in Visual Studio 2010, as shown below.

I don’t want to describe this process in any detail, you can find that elsewhere on the web (for example here).

Deploying databases in this way has advantages and disadvantages. On the plus side:
  • It’s easy.
  • It’s UI-driven.
  • It figures out most of the settings for you.
On the downside:
  • There’s no support for differential updates. In other words, the destination database is destroyed and recreated every time you deploy, so you’ll lose any data.
  • Some of the default database deployment settings are unsuitable for many real-world scenarios – this is the issue I want to focus on here.
In many cases, you’ll want to avoid the Web Deploy approach altogether and use VSDBCMD.exe to deploy and update your databases, but that’s a conversation for another day. In this post I want to focus on how you can change some of the default behaviours for database deployment using Web Deploy. In particular, Web Deploy omits object-level permissions by default. This causes problems if your database (a) contains stored procedures and (b) grants execute permissions on the stored procedures to database roles.

Suppose you’re using the Visual Studio 2010/Web Deploy approach to deploy an ASP.NET membership database from a local development machine to a destination server environment. (NB you’d typically only deploy a membership database if you’ve modified the schema, otherwise it’s easier just to run ASPNET_REGSQL.exe and create the database from scratch on the destination server). You opt for a full deployment, including schema and data from the source database. On the source database, you can see that various database roles are granted execute permissions on stored procedures:

However, when the database is recreated on the destination database server, these permissions are missing:

This can be mystifying at first—essentially, you add users to the built-in database roles such as aspnet_Membership_BasicAccess and aspnet_Membership_FullAccess, but membership of these roles has no effect. They’re basically just empty roles that aren’t mapped to any permissions.

The problem is that stored procedures are “objects” in database terms (don’t ask me, I’m not a DBA), and by default Web Deploy does not include object-level permissions when it scripts the database. To change this behaviour, you need to modify the project file for your web application project.

1. In the Solution Explorer window, right-click your web application project node, and then click Unload Project.

2. Right-click the project node again, and click Edit [project file].

3. Locate the PropertyGroup element that corresponds to your build configuration (for example Release|AnyCPU).

<PropertyGroup
    Condition=" '$(Configuration)|$(Platform)' == 'Release|AnyCPU' ">

3. Within this element, locate the PreSource element and add a Permissions=”True” attribute, as shown below. The Permissions attribute indicates that the database script should include all permissions, including object-level permissions, which are defined in the source database.

<PublishDatabaseSettings>
  <Objects>
    <ObjectGroup Name="ApplicationServices-Deployment" Order="1">
      <Destination Path="[Destination Database Connection String]" />
      <Object Type="dbFullSql">
        <PreSource Path="[Source Database Connection String]"
                   ScriptSchema="True"
                   ScriptData="True"
                   Permissions="True"
                   CopyAllFullTextCatalogs="False"
                   DriDefaults="True" />
        <Source Path="[Where to save a copy of the script]"
                Transacted="True" />
      </Object>
    </ObjectGroup>
  </Objects>
</PublishDatabaseSettings>

4. Save and close the project file.

There’s a whole host of settings you can add to the PreSource element to configure how your database is deployed. For example, if you want to deploy a database that already exists on the destination server, you need to add a ScriptDropsFirst=”True” attribute to the PreSource element – otherwise Web Deploy will complain that you’re trying to create objects that already exist. The full list of properties that you can set as PreSource attibutes can be tricky to track down unless you know how the database deployment process works:
  • Web Deploy uses the dbFullSql provider to deploy databases (the link includes some properties you can use as PreSource attributes).
  • Under the covers, the dbFullSql provider uses SQL Server Management Objects (SMO) to generate database scripts. The ScriptingOptions Properties page describes some SMO properties you can specify as PreSource attributes.

Alternatively, to get a full list of properties, you can run the following Web Deploy command:
msdeploy.exe –verb:sync –source:dbFullSql /?

There’s much more to database deployment than I can cover in a quick blog post, and we’ll cover these kinds of issues in much more detail when we publish to MSDN. For now though I hope this helps to shed some light on the intricacies of database deployment.

Deploying Web Packages as a Non-Administrator User

Cross-posted from Jason Lee's Blog

Regular readers (all six of you ;-)) will have noticed that I haven’t posted about SharePoint for a while. For the last couple of months I’ve been working with the Developer Guidance team at Microsoft to write some MSDN content on enterprise-scale web deployment and application lifecycle management. I’ll let you know when the content is available, and I don’t plan to duplicate it here. What I want to do is just to draw attention to a couple of areas that I found particularly tricky to figure out.

The first area involves the IIS Web Deployment Tool (commonly known as “Web Deploy”), and a gotcha around deploying web packages as a non-administrator user. For brevity I’ll have to assume that you’re broadly familiar with:


One of the big advantages of Web Deploy 2.0, on IIS 7 or later, is that non-administrator users can deploy web packages to specific IIS web sites. This is generally useful in two scenarios:

  • Hosted environments, where tenants need control over specific sites but do not have server-level administrator privileges.
  • Enterprise environments, where members of a development team may need to deploy specific sites but do not typically have server-level administrator privileges.

If you want to enable non-administrator users to deploy web packages, you need to configure the Web Deploy Handler on the target IIS web server. The other deployment approaches (the remote agent and the temp agent) don’t allow users who aren’t server administrators to deploy packages. I’ll assume that you’ve configured the Web Deployment Handler to allow a non-administrator user (FABRIKAM\User) to deploy content to a specific IIS website, as described here.

By default, the Web Deploy Handler exposes an HTTPS endpoint at the following address:

https://[server name]:8172/MSDeploy.axd

For example:

https://TESTWEB1:8172/MSDeploy.axd

However, when a non-administrator user deploys a web package to the Web Deploy Handler, they need to add the IIS website name to the endpoint address as a query string:

https://[server name]:8172/MSDeploy.axd?site=[site name]

For example:

https://TESTWEB1:8172/MSDeploy.axd?site=DemoSite

Why the difference? In a word, authorization. Your non-administrator user doesn’t have server-level access to IIS, they only have access to specific IIS websites. If they attempt to connect to the server-level endpoint, Web Deploy will an ERROR_USER_UNAUTHORIZED error. The event log on the destination server will show an IISWMSVC_AUTHORIZATION_SERVER_NOT_ALLOWED error like this:


So you’ve got to use the site query string. Now for the gotcha.

Due to an open bug in the current version of Web Deploy (2.1), you can’t specify a query string in the endpoint address if you use the .deploy.cmd file generated by Visual Studio to deploy your web package. In other words, this won’t work:

DemoProject.deploy.cmd /Y /M:https://TESTWEB1/MSDeploy.axd?site=DemoSite /U:FABRIKAM\User /P:Pa$$w0rd A/:Basic -allowUntrusted

I’ve seen some fairly bizarre “workarounds” for this—for example, drop the query string and use an administrator account—this works, but it kind of defeats the object when the whole point of the exercise was to use a non-administrator user to deploy the web package. What you need to do is to use Web Deploy (MSDeploy.exe) directly rather than running the .deploy.cmd file.

All the .deploy.cmd file contains is a bunch of parameterized Web Deploy commands. This is put together by the build process to take some of the work out of the deployment. For example, you don’t need to specify the location of the web package, the Web Deploy providers to use for the source and destination, the Web Deploy verb, or the location of the .SetParameters.xml file, because the .deploy.cmd file knows this already. However, there’s nothing to stop you using the raw Web Deploy commands directly. The easiest way to do this is to look at the output when you run the .deploy.cmd file – you’ll see the actual MSDeploy.exe commands written to the console window. You should see something like this (ignore the line breaks):

msdeploy.exe
-source:package='…\DemoProject.zip'
-dest:auto,
computerName='https://TESTWEB1:8172/MSDeploy.axd?site=DemoSite',
userName='FABRIKAM\User',
password='Pa$$w0rd',
authtype='Basic'
-verb:sync
-setParamFile:"…\DemoProject.SetParameters.xml"
-allowUntrusted

Run this command directly from the command line, using your non-administrator user credentials, and the deployment should succeed.

Packaging and deploying web applications is a fairly broad and complex topic, and I’ve had to gloss over many of the details in this blog post. The content we’re developing for MSDN will cover these kinds of issues in much more detail, and I’ll link to the content as soon as it’s available.

Thanks to Tom Dykstra at Microsoft for helping me troubleshoot the issue and pointing out the bug.